Envision#
The above video is out of date; some steps have changed.
Envision is a graphical app that acts as an orchestrator to get a full Monado setup up and running with a few clicks.
Envision constructs both an OpenXR runtime (provided by Monado) and an OpenVR implementation (provided by xrizer, OpenComposite or VapoR), for games or other client applications. Please note these OpenVR implementations are incomplete and contain only what’s necessary to run most games for compatibility.
For OpenVR games, xrizer is usually sufficient, but for other OpenVR games that don’t work with it (e.g. issues with controller input, or crashing on startup), try OpenComposite or VapoR.
Developers: If you plan to create your own VR software on Linux, you should build it against the OpenXR specification instead of OpenVR, if possible.
Envision’s two profile modes#
Envision has two profile modes - system profile mode and development profiles mode.
-
The system profile#
The system profile uses Monado and xrizer by assuming they are already provided/installed to the system via your distro’s package manager.
-
Development profiles#
Development profiles are customizable builds of Monado and xrizer from their source code. Envision will do its best to guide you through what is essentially setting up a full development environment, then it will build Monado and xrizer for you.
Although the default as of mid-2026 is system profile, almost no distros actually provide VR packages (e.g. Monado and xrizer) in their repos, and the ones that do, ship the “stable”/release versions of them. Due to the inherently unstable/fast-moving nature of VR, any “stable” releases quickly become out-of-date and so are unsuitable for most setups.
On top of that, some headsets or apps require custom/WIP forks of Monado or xrizer. For this reason, many users will need to enable development profiles (it depends, though, so keep reading).
❗ ImportantDon’t confuse the two: Developer mode isn’t the same as development profiles, even though getting to development profiles requires you to first enable developer mode.
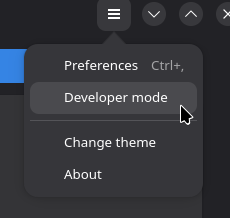
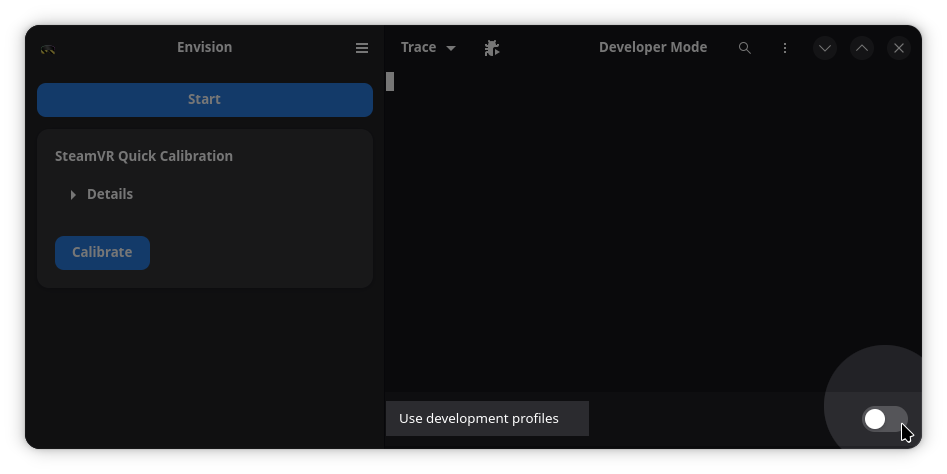
Enable developer mode to expose the option to enable development profiles, as well as view the logging output of Monado and any enabled plugins. You can use developer mode with either profile mode.
Installing Envision#
Packages are available on AUR. You will need the following packages:
- envision-xr-gitAUR
- If you don’t need a fork of Monado/xrizer for your setup, use the system profile, and install these:
- monado-gitAUR (is already included as a dependency) for the OpenXR runtime itself.
- xrizer-gitAUR (is already included as a dependency) for compatibility with OpenVR games, and OpenXR Proton games.
- (optional) opencomposite-gitAUR or vapor-openvr-gitAUR, for OpenVR games that don’t work in xrizer.
- (optional) monado-multilib-gitAUR and lib32-xrizer-gitAUR for compatibility with 32-bit games.
- If you do need a fork of Monado/xrizer, you will need to enable development profiles; keep this in mind once you get Envision running.
Please read the Arch Wiki page for AUR to learn how to install these.
There are three methods. Either way, you will need to enable development profiles; keep this in mind for later.
Installing from Terra repos (recommended)#
Terra repos have the nightly version of Envision.
Set up Terra, then run sudo dnf install envision-nightly.
Envision will let you know what dependencies you are missing when you attempt to build a development profile.
Installing from AppImage#
See #Installing the latest Envision AppImage.
Installing from Fedora repos#
While Fedora does have Envision in its repos, it ships the current latest stable release (3.2.0) of Envision, which is just prior to a major rewrite.
Meaning, a lot of the information you read on this page will not apply if you go this route. Choose another installation method instead, if you can.
To install from Fedora repos:
sudo dnf install envision envision-monado envision-xrizerThis will install Envision 3.2.0 (from September 2025) and the build dependencies for Monado and xrizer (not Monado and xrizer themselves).
Side note: Fedora is in the process of packaging xrizer as a proper binary package: Copr @xr-sig/xrizer. This is unlikely to be useful until the system profile mode becomes viable on Fedora.
See the Fedora Atomic page for instructions.
Monado and xrizer are available on Guru, but Envision itself is not.
- If you don’t need a fork of Monado/xrizer for your setup, use the system profile, and install these:
media-libs/monadofor the OpenXR runtime itself.media-libs/xrizerfor compatibility with OpenVR games, and OpenXR Proton games.- (optional)
media-libs/opencompositefor OpenVR games that don’t work in xrizer.
- If you do need a fork of Monado/xrizer, install none of these. You will need to enable development profiles; keep this in mind once you get Envision running.
As for Envision itself, build it from source, or see #Installing the latest Envision AppImage.
See the NixOS page for instructions.
Installing the latest Envision AppImage#
Download the latest AppImage snapshot. Unless otherwise specified above, you most likely will not have Monado or xrizer available from your distro’s packages, and you will need to enable development profiles; keep this in mind.
Getting started#
Will you be using the system profile? Or the development profiles? The #Installing Envision section should have told you which profile mode you will be using. Go back and check if you need to.
- Jump to #Using the system profile
- Jump to #Enabling development profiles
Using the system profile#
Skip this section if you are using development profiles.
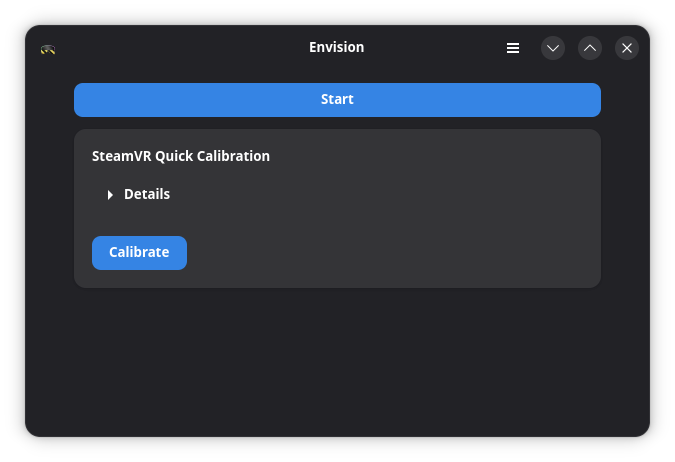
This is what it looks like when Envision is in system profile mode, the default:
In the ≡ main menu, in the preferences modal window, there are several tabs:
- General
- OpenVR compatibility (Default: xrizer) - Switch between xrizer, OpenComposite, and VapoR. Use xrizer as your default/first choice, and try the others if xrizer doesn’t work. Also see #OpenVR compatibility.
- Render scale percentage (Default: 140) - Sets the scale of the compositor. If you set
OXR_VIEWPORT_SCALE_PERCENTAGEon any games, the effect is multiplicative. Equivalent toXRT_COMPOSITOR_SCALE_PERCENTAGE. - Compositor GPU acceleration (Default: on) - This should always be on. Equivalent to
XRT_COMPOSITOR_COMPUTE. - Use minimum frame period (Default: off) - Enable this to disable limiting the application to a calculated frame rate. This will use more power. Equivalent to
U_PACING_APP_USE_MIN_FRAME_PERIOD. - Monado UI (Default: off) - Enables the Monado debug GUI (not to be confused with the seldom-used
monado-guiprogram). Equivalent toXRT_DEBUG_GUIandXRT_CURATED_GUI. - Nvidia mitigation (Default: off) - Enables hacks needed for Nvidia GPUs to have reasonable latency. This should be on if you use an Nvidia GPU. See Monado#Latency when moving your head. Equivalent to
U_PACING_COMP_TIME_FRACTION_PERCENT=95andXRT_COMPOSITOR_USE_PRESENT_WAIT=1. - This menu only applies to the system profile. When running a development profile, use the equivalent environment variables by editing your profile.
- Advanced
- Set additional environment variables for the Monado service. See #Configuring the Monado service with environment variables.
- This menu only applies to the system profile. When running a development profile, variables set here have no effect.
- Plugins
- Launch additional apps when you start the Monado service. See #Plugins.
All the settings in General and Advanced tabs only apply when you are using the system profile.
The Plugins tab applies the same to both profile modes.
Enabling development profiles#
Skip this section if you are using the system profile.
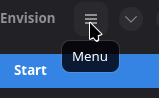
To enable development profiles, find and enable Developer Mode, then the switch to enable development profiles will appear. For a visual guide, follow these steps:
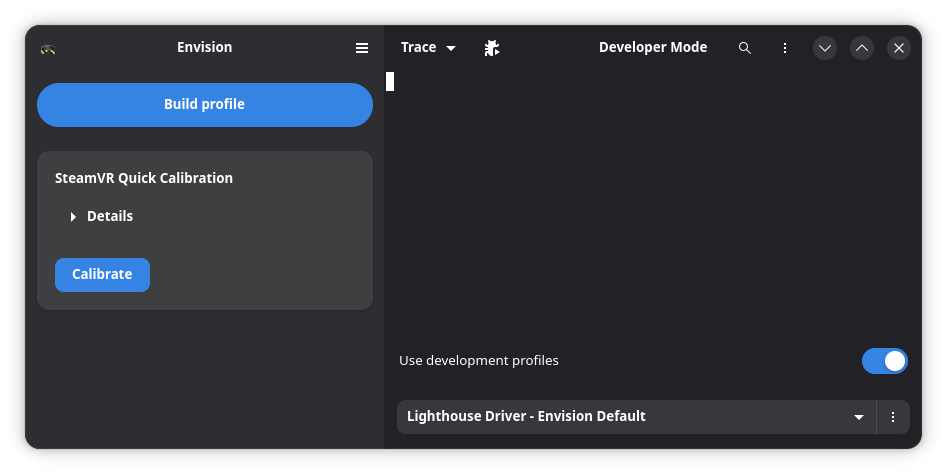
Selecting a development profile#
Once development profiles are enabled, you will need to select a profile in the dropdown at the bottom right of the window.
Profiles that are available by default:
- Lighthouse Driver: Proprietary SteamVR Lighthouse driver with top tracking quality. Recommended for Lighthouse HMDs.
- Uses Monado’s “steamvr_lh” driver.
- SteamVR must be installed.
- You must have a calibrated SteamVR playspace. You can either:
- Run a Quick Calibration right in Envision.
- Or, launch SteamVR just long enough to complete calibration.
- Or, transfer the
~/.steam/root/config/chaperone_info.vrchapfile from another drive.
- OpenHMD: Recommended for Oculus CV1 HMDs.
- Simulated Driver: Dummy driver for testing on a flat screen.
- Survive: FOSS Lighthouse driver implementation. Lower tracking quality and less robust than SteamVR proprietary.
- WMR: Use with most SLAM-based headsets, such as Windows Mixed Reality (WMR) and Rift S.
- This one is rarely useful on its own. See #WMR & Rift S controller tracking to opt-in to a WIP branch with better constellation tracking.
If you need to use one of the experimental feature settings for your hardware or distro, do that now.
Envision no longer supports building WiVRn profiles, as it’s become much simpler and easier to install WiVRn directly. See the WiVRn page if you are affected by this change.
Start the session#
Many issues are covered by Envision’s automation, but not all of them, yet. It is essential to read the Monado page before starting a session.
Click the “Start” button. The Monado service will launch. If you have developer mode enabled, you will see the logging output on the right side of the window.
Monado does not have a “void” or launcher or dashboard out of the box, so after starting the session, your headset display will power on but stay black. This means you can now start VR/XR applications.
You may want to launch WayVR as a first test of your OpenXR runtime. WayVR lets you access your desktop, launch other VR titles, set audio settings, move your playspace, and more. Once you have a grasp on how WayVR works, you should tell Envision to start it automatically by enabling it in the plugins menu. From then on, it will act as the “void” or “Home” environment that Monado otherwise lacks.
Plugins#
Envision’s plugins system will let you run external apps automatically alongside your VR session.
In Envision’s preferences, the Plugins tab displays a list of all VR overlays/tools detected on your system. If you don’t see anything in this list, you still need to install them; just having them downloaded doesn’t count.
Examples of recognized plugins include:
- WayVR (essential and recommended!) - Desktop overlay, customizable watch, dashboard launcher, playspace mover, and more
- LÖVR Playspace - Room boundary for OpenXR (doesn’t support AppImage installation via Gear Lever yet)
Envision scans for plugins by looking through your app launcher (the equivalent of “the Start menu”). Installing the plugin from your distro’s package manager is one way to do this.
If you downloaded an AppImage of a recognized plugin it won’t show in the plugins list, because it’s not in your app launcher. Try using Gear Lever, an app that manages AppImages and adds them to your app launcher. When you restart Envision, your plugin should appear in the list.
Manually creating a plugin#
More specifically, any desktop entry that is visible in your app launcher (“Applications Menu”) and includes the key X-XR-Plugin=true is considered a Plugin.
Plugins can also run at shutdown, with X-XR-Plugin-Execution-Time, which is useful for e.g. base station power management scripts.
The specifics of the Plugin keys are documented in the XR Plugin Spec section of Envision’s README.
Using WayVR as an example:
~/.local/share/applications/wayvr.desktop
[Desktop Entry]
Type=Application
Name=WayVR
Comment=Your way to enjoy VR on Linux
Exec=wayvr
Icon=wayvr
Terminal=true
Categories=Utility;X-WiVRn-VR;
X-XR-Plugin=true
X-XR-Plugin-Exec=wayvr --openxr
Here’s a second example. This is a generic pair of plugins, one that runs when starting VR, and another to run when stopping the session:
~/.local/share/applications/my-plugin-start.desktop
[Desktop Entry]
Type=Application
Name=My Plugin - Start
Exec=/path/to/my-plugin.sh start
Terminal=true
Categories=Utility;
X-XR-Plugin=true
X-XR-Plugin-Exec=/path/to/my-plugin.sh start
X-XR-Plugin-Execution-Time=after-start
~/.local/share/applications/my-plugin-stop.desktop
# ...
X-XR-Plugin=true
X-XR-Plugin-Exec=/path/to/my-plugin.sh stop
X-XR-Plugin-Execution-Time=after-stop
After adding new desktop files, Envision must be restarted for these to show up in the Plugins list.
Old plugin system#
The old plugin system was removed shortly after the v3.2.0 release. This may only be relevant for users who are either purposefully sticking with the release version, or Fedora users who chose to install from Fedora repos.
See the Old Plugin System page if you fall into this group.
Editing development profiles#
Next to the profile dropdown, select the ⋮ dots menu, then click Edit profile.
To start editing a copy of the currently selected profile, choose Duplicate profile instead.
The profile editor has lots of settings, but here are the most important ones:
Dependency check#
This setting controls whether or not Envision should try to help you gather build dependencies before building a profile.
Envision does not, by itself, include everything needed to run VR. Instead, it looks for system files needed to build your selected profile. If some necessary files aren’t found, and lists out the packages you’d need to install. This is “dependency checking”. The exact names of packages differ between distros, so Envision detects the distro it’s running in. However, Envision’s dependency database can occasionally grow outdated, especially if your distro is less popular.
If Envision prompts you to install a package you definitely have installed, try disabling this option (and opening a bug report). Otherwise, leave it enabled.
XR service#
This section controls how Envision builds and launches the Monado service.
The term “XR Service” refers to Monado in every case.
If you need to set up one of the experimental feature settings, copy the link to the repo into XR Service Repo, and the name of the Git branch into XR Service Branch.
XR service CMake flags#
This is a section to add build-time CMake flags. CMake flags are not environment variables.
To add a CMake flag, click the ➕, paste in the variable-value pair (omit the -D prefix, if any), e.g. XRT_FEATURE_OPENXR_VISIBILITY_MASK=OFF, then hit Enter.
After you Save the profile, you must do a clean build for CMake flag changes to take effect.
There is no centralized list of CMake flags. You must read the Monado source code for that. A good place to get started is Monado’s CMake file.
OpenVR compatibility#
This section controls how Envision builds the chosen OpenVR compatibility module.
Monado is an OpenXR runtime, and xrizer/VapoR/OpenComposite is the “adapter” that allows OpenVR games to run on Monado. Many (maybe even most) PCVR games use OpenVR, so this is naturally an important component.
List of OpenVR compatibility modules (choose one):
- xrizer works for most situations, and is actively being developed.
- OpenComposite is only here as a last resort. It is no longer being developed.
- VapoR is focusing on supporting games that xrizer has trouble with, by taking a lower-level approach in its design.
Environment variables#
The environment variables specified in this section will be applied to the Monado service when it launches. See #Configuring the Monado service with environment variables.
You do not need to clean build if the only thing you changed was environment variables.
Configuring the Monado service with environment variables#
The Monado service (the monado-service binary) is primarily configured with environment variables. Envision exposes two separate ways to set variables, entirely depending on your profile mode:
- System profile - Add environment variables to the list in Preferences → Advanced tab. See #Using the system profile. Note that most of the settings in the General tab correspond to one (or more) environment variable each.
- Development profiles - Add environment variables to the section in the development profile editor.
Envision will pass these along when starting the Monado service in that profile mode.
Both ways are totally separate; none of the settings in the General or Advanced tabs in Preferences will have any affect on development profiles.
To add an environment variable, click the ➕, paste in the variable-value pair without any spaces or quotes, e.g. LH_DISCOVER_WAIT_MS=10000, then hit Enter.
These lists are for environment variables meant for monado-service, and not for the game/app/OpenXR client. For example, The variables that start with XRT_, U_, LH_, or WMR_ should be added to this list (these are just a few examples - some may start with a different prefix). Variables beginning in OXR_ must go on the game’s launch options instead.
💡 TipWhile these lists are primarily used to configure the Monado service, the environment variables also get passed to launched plugins and the “Launch Monado GUI” button.
For example, you could add
RUST_LOG=debugto this list, and upon starting the session (in the respective profile mode), WayVR will output extra troubleshooting logs in Envision’s log output in the Developer Mode pane.
There is no centralized list of all known environment variables. New variables are being added and removed and reworked every week. Some Monado forks (such as the ones in #Experimental feature settings) add a few more of their own branch-specific dials to tweak. Setting XRT_PRINT_OPTIONS=1 will print the names of all recognized environment variables as the code accesses them, which may help you discover more of them, but documentation is sparse. You have to read the Monado source code if you want a fuller list. And even then, some environment variables aren’t even written into Monado itself, and are instead picked up by an inner dependency of it. In the meantime, this wiki tries its best to mention the most important environment variables.
Connect SteamVR games to Envision#
Upon launching Envision for the first time, it will ask permission to set up Proton to allow VR games to connect to it. Click “Add configuration file”. You must reboot your PC afterwards for this setting to take effect.
Envision does this by creating a file in ~/.config/environment.d/ (XDG directories may vary) that sets the PRESSURE_VESSEL_IMPORT_OPENXR_1_RUNTIMES environment variable to 1. The purpose of this variable is to tell Steam, and all Steam games, particularly Steam Linux Runtime games, which includes Proton games, to respect our setting of the active OpenXR runtime (Monado).
This file may not do anything if your desktop environment does not launch programs (especially Steam or Envision) in the systemd user instance. KDE Wayland and GNOME Wayland are confirmed to work. Linux Mint Cinnamon X11 users have reported problems. You must set this variable to 1, as user-wide as possible. Try /etc/environment. Read systemd/User#Environment variables (ArchWiki). If all else fails, set PRESSURE_VESSEL_IMPORT_OPENXR_1_RUNTIMES=1 %command% per-game on your Steam launch options.
Steam Flatpak#
To use Envision with the Flatpak version of Steam, you’ll need to add the following filesystem overrides to Steam using an application like Flatseal:
xdg-data/envision:roxdg-run/monado_comp_ipcxdg-config/openxr:roxdg-config/openvr:ro
Alternatively, you can use the following command:
flatpak override --filesystem="xdg-data/envision:ro" --filesystem="xdg-run/monado_comp_ipc" --filesystem="xdg-config/openxr:ro" --filesystem="xdg-config/openvr:ro" com.valvesoftware.SteamExperimental feature settings#
The following resources will enable early access to hardware support or other runtime features before the code is fully upstream in Monado itself. To use these, duplicate your development profile, edit the XR Service Repo and XR Service Branch fields with the listed values, then Save and Clean Build.
See #Editing development profiles.
WMR & Rift S controller tracking#
This enables positional tracking for WMR controllers in full 6dof. Includes Rift S support & controllers.
To use this, first duplicate the WMR - Envision Default profile.
For the Envision XR Service settings:
- Repo:
https://gitlab.freedesktop.org/thaytan/monado - Branch:
dev-constellation-controller-tracking
Experimental Pimax support branch#
Main article: Pimax
Modest WIP. Allows certain Pimax HMDs to function with Monado. Look Ma, no Pitools!
For the Envision XR Service settings:
- Repo:
https://gitlab.freedesktop.org/Coreforge/monado/ - Branch:
pimax
Dumped distortion parameters can be found on othello7’s repository, please follow the instructions in their readme, and consult with LVRA Community to add your own if missing.
OpenHMD Rift CV1 support#
The Oculus Rift CV1 is supported on the profile “OpenHMD - Envision default”. The XR Service Repo and Branch are already set up.
On first run, start the profile with your headset placed on the floor in clear view of all bases. This calibrates your playspace origin.
A calibration of base stations will be saved to disk at ~/.config/openhmd/rift-room-config.json. To reset and recalibrate, delete this file and repeat the process.
Frequently asked questions#
Where did my plugins go?/Why is the plugins menu empty?#
The old plugins system let you click a button to download plugins. In contrast, the current plugins system expects you to install them yourself. See #Plugins.
How do I get the dropdown to select my headset?#
In recent versions of Envision, the dropdown to select a development profile only shows up in Developer Mode. See #Envision’s two profile modes.
Troubleshooting#
Monado service quirks#
Many issues are covered by Envision’s automation, but not all of them, yet. It is essential to read the Monado page before starting a session, especially if you have an Nvidia GPU.
Monado exited with code 11#
If you start the Monado session, and you see this in the log output in the Developer Mode pane:
Monado exited with code 11
This indicates a runtime error; a Segmentation Fault. This is a category of errors; there are any number of different causes. The root cause depends on what’s in the rest of the log.
A few known recurrent reasons for exit code 11:
- Lighthouse tracking users: SteamVR will occasionally update
driver_lighthouse.so, which Monado’ssteamvr_lhhooks into directly; your version of Monado is not yet updated to match.- Upgrade Monado (if you use a custom XR service branch, ask your maintainer to rebase it), downgrade SteamVR, or switch to a different beta branch of SteamVR.
- Monado’s compositor failed to acquire a lease on your headset display
- Check your Display settings, ensure all cables are secure, and cycle power to your headset.
Error while loading shared libraries#
Any time you get:
monado-service: error while loading shared libraries: <some library>.so.<some number>: cannot open shared object file: No such file or directory
it’s because “SomeLibrary” got updated on your system, so Monado or one of its dependencies must be rebuilt in order to link to the new version of the library. How to do this depends on your profile mode:
- If using a development profile, clean build the profile with Ctrl+F5. Or, click the ⋮ (the one at the top of the Developer Mode pane) and click Clean build profile.
- If using the system profile, rebuild the packages you used to install Monado.
If you’re seeing this on the system profile, odds are you’re using an Arch-based system, so here’s an example using paru:
paru -Qo monado-service # which do I have installed? - `monado-git`, `monado-multilib-git`, etc?
paru -S --rebuild 'monado-multilib-git' # or whatever was printed in the previous command
Arch Linux users should consider using rebuild-detector to detect this situation.
Some common examples of the error text follows, for searchability’s sake.
/usr/bin/monado-service: error while loading shared libraries: libopencv_imgcodecs.so.413: cannot open shared object file: No such file or directory`
Monado exited with code 127
ninja: build stopped: subcommand failed, Build failed#
This is only for development profiles.
If building a profile ends in this error:
ninja: build stopped: subcommand failed.
Build failed!
This is a compilation error. You may be missing dependencies, have an extra uneeded dependency (e.g. libsurvive), your distro updated a dependency to one that introduces a breaking change, or the code itself may just be broken.
It’s impossible to tell what the problem is with only the above message, though. If someone is providing support, please send the whole log.
fatal: Need to specify how to reconcile divergent branches#
This only for development profiles.
If you want to update your profile, and Update on Build is enabled, it might fail with this error:
Your branch and 'origin/some-branch' have diverged,
and have 1 and 1133 different commits each, respectively.
  (use "git pull" if you want to integrate the remote branch with yours)

hint: You have divergent branches and need to specify how to reconcile them.
[...]
fatal: Need to specify how to reconcile divergent branches.
Build failed!
This is an Envision logic bug. This can happen if the author of the branch you are using does a Git force-push, especially after rebasing. To work around this, duplicate the development profile and continue from there.
Parallel view issues#
In OpenVR games, some headsets may give you a cross-eyed or double vision effect. This affects headsets with canted displays (e.g. Valve Index, Pimax).
You can add OXR_PARALLEL_VIEWS=1 %command% to launch arguments to fix this.
The SteamLinuxRuntime_sniper-arm64 issue#
Note: This is an old bug that only affects Steam installs from mid-2025.
Show details
If VR games inexplicably launch in desktop mode (even after ensuring Envision app was launched after Steam did), or Envision crashes with this in terminal/logs:
thread ‘main’ panicked at src/util/file_utils.rs:165:9:
Failed to copy /home/USERNAME/.local/share/Steam/steamapps/common/SteamLinuxRuntime_sniper/_v2-entry-point to /home/USERNAME/.local/share/envision/backups/_v2-entry-point.bak: No such file or directory (os error 2)
This is because Valve accidentally changed this installdir. This has since been fixed on their end, but anyone who has installed or moved the runtime between 18 July 2025 and 6 August 2025 will run into this, even if they are not using ARM64. Uninstalling and reinstalling sniper would fix this but it’s difficult with Protons installed. Removing the files and forcing revalidation doesn’t work either; it’ll still install to -arm64. You may symlink it:
ln -s ~/.steam/steam/steamapps/common/SteamLinuxRuntime_sniper-arm64 ~/.steam/steam/steamapps/common/SteamLinuxRuntime_sniper
# or if it's located on a different drive e.g. /mnt/steam
ln -s /mnt/steam/steamapps/common/SteamLinuxRuntime_sniper-arm64 /mnt/steam/steamapps/common/SteamLinuxRuntime_sniper
Or, you may find “Steam Linux Runtime 3.0 (sniper)” in your Steam library and use the “Move install folder” button to move it to another drive and back. This will force it to take on the fixed install dir.